12 Days of Data: Prompt Engineering Explained 🛠️
So far in my 12 Days of Data blog series, I’ve covered the project scope and shared a diary to track the progress made over the 12 days.
Now the project is complete, I thought it would be nice to explain some key insights into prompt engineering. I’ll explore how even the smallest changes can have a dramatic impact, either improving or hindering the quality of GPT model output.
Prompt Engineering
So, what exactly is prompt engineering?
Prompt engineering is the process of building the best possible prompts to pass into Large Language Models (LLMs) to get the best possible output. It’s about finding the most effective way to communicate instructions to LLMs to get quality results.
How to craft prompts?
Everyone who has used ChatGPT has had practice in creating prompts! Here are a few key points I found most useful when building prompts:
1. Set Goals
To begin with, I found it helpful to define key areas I wanted to be included in the model’s output. For example, in this project, there were four key user inputs: Character Type, Genre, Location, and Theme. I needed all the generated stories to include each input the user set. For example, the prompt for a comedy genre would be different from the one for a horror genre. To address this, I used if statements and added specific sentences to my prompts depending on the user’s inputs. This allowed me to tailor the generated story to each user.
I had other goals for the output too. Since LLMs can sometimes produce random and illogical output, I wanted to control both the language style and structure to ensure stories were imaginative but also relatable. I also thought about other important elements of a good story, such as a clear plot, character development, and character interaction.
2. Be Clear and Concise
Through experimenting with prompt language, one thing became clear to me: concise, well-structured prompts typically produce the best output. I like to think that each word included in the prompt must have purpose and repetition should be avoided. When I added reworded phrases or redundant details to the prompt, the output became less clear and confusing at times. LLM’s can struggle with ambiguity and if prompts are not concise, the output can be off-track.
3. To Experiment and Refine
For me, the most important aspect to prompt engineering is to experiment and play around with the language you use in prompts to see how changes affect the output. Prompt engineering is an iterative process, and it can be hard to know when to stop. The best approach is to make small changes, see their effects, and refine the prompt further if necessary.
4. Understanding Model Limits
Prompt engineering is a great way to improve the output of LLMs but it’s important to note that LLMs are models and come with their own limits. Aside from refining prompts, there are other factors that you affect the quality of LLM outputs. In the following section, I’ll discuss these factors and share how to connect to the GPT API to send and receive requests.
Examples of Good and Bad Prompts
Let’s look at some good and bad prompts – for this, let’s assume there are only two user inputs: Character Type and Genre.
Character Type: Elf
Genre: Horror
Bad Prompt
Write a short, Christmas themed horror story about an Elf.
The prompt is not very specific and leaves too much room for interpretation. It simply asks for a ‘Christmas-themed horror story about an Elf,’ which can lead to vague and generic responses from the model. Without setting instructions on tone, structure, or character development, the story may lack depth and creativity. Also, Christmas and horror are typically conflicting genres, extra care needs to be taken to ensure that the story flows logically and blends well. To do this, further details in the prompt is required to help guide the LLM.
Good Prompt
Write a story about an Elf.
Start with a strong hook to grab the reader’s attention.
Build a chilling atmosphere with eerie twists and unsettling events.
Use vivid descriptions to create suspense and tension.
Develop well-rounded characters who interact as the story unfolds, balancing creativity with realistic actions.
Structure the plot with a clear beginning, middle, and end, connecting subplots to the main storyline.
Conclude with a reflection on the lessons learned by the characters.
Use simple language to make the story suitable for all ages.
This prompt is a lot better, it passes a lot more details to the LLM. It gives clear instructions on how to build tension, develop characters, and structure the plot. By specifying the introduction of ‘twists’, and balancing ‘creativity with realistic actions’, the prompt ensures that the story is engaging and logical. Also, the prompt states to only use simple language to ensure output includes common words – sometimes LLMs can output words which are not often used in everyday language.
Connecting to GPT 4
Set Up the API Key
First step is to set up an account with OpenAI and generate an API key.
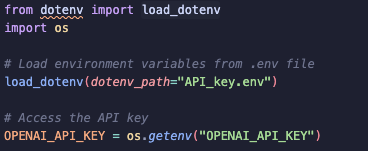
Next, create a .env file and store the API key to a variable.
Note: Be mindful of formatting and use of spaces.

Keys should always be kept confidential and only visible to yourself. Since I share my projects on GitHub, I added .env file to .gitignore file to ensure my API key is hidden.
Environment files are used to store environment variables which are often used to avoid hardcoding sensitive information like API keys in files/notebooks. To access the API key in notebooks or scripts, use the load_dotenv library.

Test API Connection
First, select the model you want to use - I chose to use GPT-4o and so needed to credit my account before using the API.
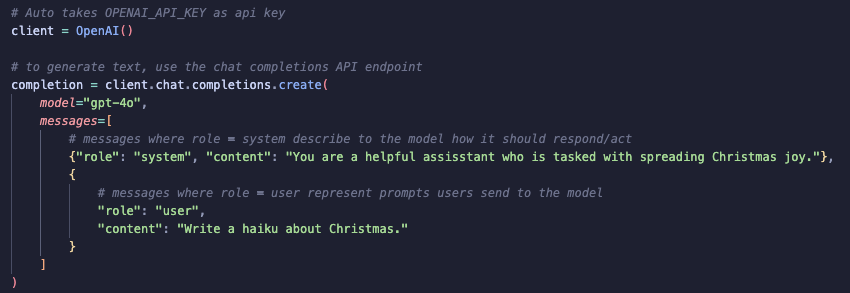
I followed the example in the OpenAI documentation to test my API connection, changing the prompts to stick to my Christmas theme!

Let’s have a closer look at the code:
1. client
-
Creates an instance of OpenAI API.
-
The API key is automatically set to OPENAI_API_KEY (set earlier in script).
-
Once instantiated, client can be used to call different API endpoints to send and receive requests.
2. client.chat.completions
-
An API endpoint used to interact with GPT models to generate text outputs based on prompts set by users.
-
.create()is a method used to send a request to the OpenAI API, this is where prompts and parameters of GPT models are set.
3. model
- Specifies which model the API should use to generate output.
4. messages[]
-
Each message is a dictionary of two keys: role (who is sending message) and content (actual content of message sent to model)
For this project, I am using these two roles:
-
System: Sets the model behaviour
-
User: A prompt the user wants the model to respond to
Content is passed as text, it can be a prompt or some instruction to send to the model.
-
-
All messages are passed to the model as a list. I like to think of messages like a conversation between the user and model, with the user providing all information the model needs to generate a relevant reply.
To access the response generated by the model, use:

GPT Parameters
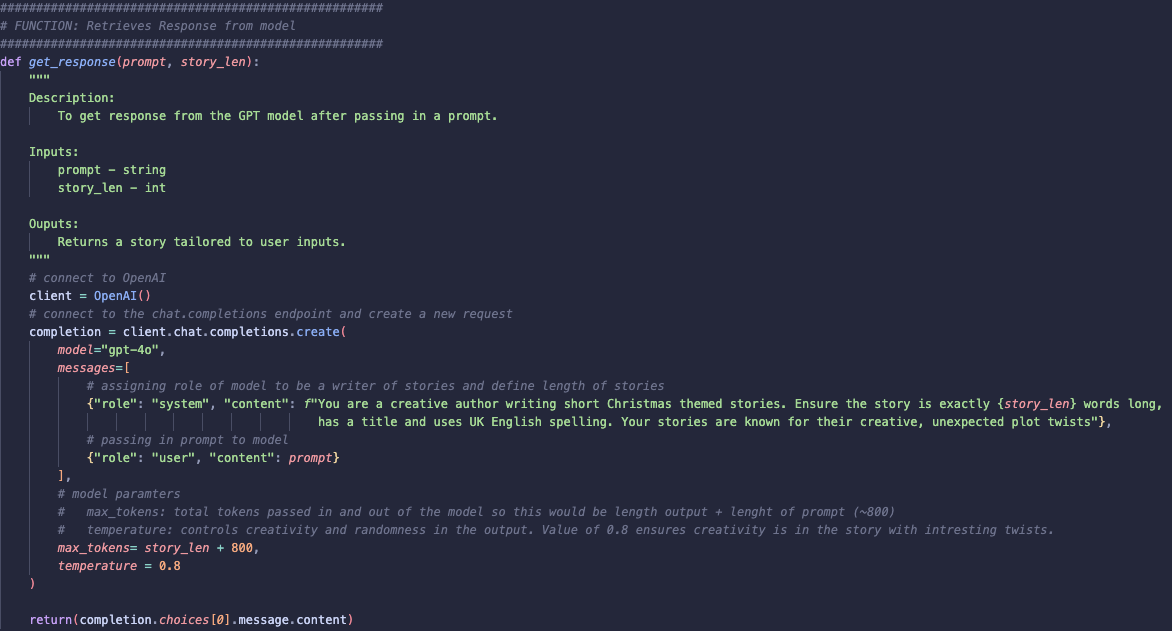
As mentioned earlier in the post, you can play with the parameters of the GPT model to increase the quality of the output. For this project, I focused on max_tokens and temperature.

1. max_tokens: story_len + 800
-
Sets a limit on the total number of tokens passed to and from the model.
-
I fixed this limit to length of story (a user input) + 800 tokens to ensure the generated response is not cut off.
-
I had to be careful when setting this to ensure that the total number of tokens (both prompt and response) would not exceed the
max_tokenslimit, which could result an unfinished story.
2. temperature: 0.8
-
Controls the randomness and creativity of the model’s responses.
-
Typically ranges from 0 to 1. With a lower value, the model’s responses are more factual and predictable, while a higher value introduces more creativity and randomness.
-
I set the temperature to 0.8 to balance creativity with coherence. This allowed the story to be imaginative while still including realistic events that readers could relate to.
Summary
I had a great time completing this project! Not only did I gain experience in prompt engineering, but it also helped me get into the festive spirit! This project wasn’t too complex to do and was the perfect challenge for the 12 days, especially in the run up to Christmas! To see the full project, visit the GitHub repository for 12 Days of Data.